
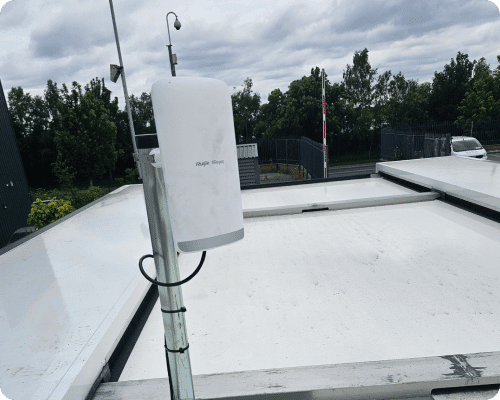
Wi-Fi Distribution in Dublin for Outdoor Coverage
You set up a garden office, desk ready, coffee poured. You open your laptop to work, but the Wi-Fi icon flickers once and drops out completely.
It happens daily across Ireland. Modern homes rely on thick concrete blocks and foil-backed insulation boards like Kingspan. Great for trapping heat, terrible for wireless signals. Radio waves hit those foil layers and bounce straight back inside.
Buying a cheap plug-in extender from a local shop won’t solve it. Extenders grab whatever weak signal reaches your back window and repeat that poor connection to your shed. You get full bars on your screen, but zero actual speed.
Before spending money on upgrading your main broadband, you need a proper physical or wireless link to send internet outside.
Here is how we bring fast, stable internet to any shed, workshop, or farm building.
Quick Answer: How to extend Wi-Fi to a shed? To extend Wi-Fi to a shed, pick a method based on distance and wall construction. Use a Powerline Adapter for short runs on one electrical circuit. Use Outdoor Mesh Wi-Fi for garden offices under 30 meters away. Use a Point-to-Point Wireless Bridge for farm buildings up to several kilometers out. For maximum speed, bury a Cat6 Ethernet cable in a shallow trench.
The Problem: Why Traditional Wi-Fi Stops at the Back Door
Standard home routers broadcast 2.4 GHz and 5 GHz radio frequencies. These signals move through open room air easily. Place concrete walls, double glass, and foil insulation in their way, and signal strength dies instantly.
Distance makes it worse. Signal power drops sharply over space. If your mobile phone drops off the network on the patio, expecting an indoor router to reach a shed fifty feet away is impossible. We must bypass these barriers using gear built for outdoor routing.
Method 1: Powerline Adapters
Powerline networking uses the electrical copper wiring running through your walls to move data packets.
How It Works
Plug one adapter into a socket near your router and connect them with an Ethernet cable. Plug the second adapter into a wall socket in your shed. Data travels down the electrical wire, bypassing thick exterior walls. The second unit broadcasts Wi-Fi inside the room.
Pros and Cons
- Pros: Very cheap, takes two minutes to set up, needs zero drilling.
- Cons: Both buildings must share the same electrical fuse board and meter. Old wiring cuts speeds heavily.
Verdict
A practical choice for a simple garden shed if you only want to check emails, provided the shed shares the main house trip switch.
Common Mistake: People often buy powerline kits for rural sites without checking their fuse boards. If your shed runs on a separate sub-board or secondary meter, powerline adapters fail to connect.
Method 2: Outdoor Mesh Wi-Fi
Mesh networks replace single routers with a team of smart access points that share data seamlessly across a property.
How It Works
Plug the primary mesh hub into your modem. Put a secondary node indoors by a back window. Then, mount a weatherproof outdoor mesh unit on the exterior wall of your house or shed. The outdoor unit beams signal across the yard without fighting indoor wall barriers.
Pros and Cons
- Pros: Creates one seamless network name. Your phone stays connected as you walk from the house to your garden office.
- Cons: Range caps out around 30 to 50 meters. Heavy foil insulation on garden rooms can still block signals trying to enter.
Verdict
Ideal for garden offices across the lawn needing clean coverage for laptops, phones, and smart devices.
Expert Insight: Indoor extenders choke on foil-backed insulation. Mounting an external mesh node on the outer wall bypasses the foil barrier completely. If DIY efforts leave dead spots, booking a professional Wi-Fi extension gets the job done right.
Method 3: Point-to-Point Wireless Bridge
When sending internet to a distant farm shed, workshop, or secondary house 100 meters to several kilometers away, the mesh falls short. Wireless bridges are the standard fix for rural sites.
How It Works
We mount two compact, weatherproof directional dishes (like Ubiquiti NanoBeams) on both building exteriors. The main dish bolts to your house eaves and connects to your router. The receiving dish mounts on the outbuilding roof. The dishes align to beam a narrow data signal across open space into a local access point inside.
Pros and Cons
- Pros: Delivers full broadband speeds over long distances. Ignores heavy rain, wind, and freezing weather.
- Cons: Needs a clear line of sight. Overhanging trees, metal sheds, or hills blocking the path will cut the signal.
Verdict
The gold standard for farmyards, agricultural sheds, and remote home offices located far from the main house.
Practical Experience: We recently built a point-to-point link across 400 meters on a dairy farm in Cork, sending 500 Mbps straight to their calving sheds for live camera feeds. Combining this bridge with satellite internet for rural properties lets farmers share fast connections across large acreage without paying extra monthly broadband fees.
Method 4: Direct Ethernet Trenching
If you want a connection that never drops, ignores weather, and lasts for decades, run a wire underground.
How It Works
Dig a shallow trench (18 to 24 inches deep) between the house and outbuilding. Lay a protective plastic conduit pipe, then pull an outdoor-rated, UV-resistant Cat6 cable through it. Connect one end to your house router and the other to a Wi-Fi access point in your office.
Pros and Cons
- Pros: Guaranteed full speed, zero latency, total protection against wireless interference or bad weather.
- Cons: Requires manual digging, trench work, and wall drilling.
Verdict
If you are already digging up the lawn, putting in a patio, or laying a driveway, always bury an Ethernet duct while the ground is open.
Pro Tip: Never bury standard indoor Ethernet cables in soil. Moisture breaks down the jacket within months. Always use gel-filled, external-grade Cat6 cable inside a duct.
Pre-Installation Checklist
Before buying gear, walk your property and check these four points:
- Check your electrical fuse board to see if the outbuilding shares a circuit with the house.
- Measure the exact distance using a tape or laser measure.
- Walk the path between buildings to spot trees, hedges, or vehicles blocking the line of sight.
- Check outbuilding wall materials for stone, single brick, or foil insulation.
Quick Comparison Table
| Feature | Mesh System | PtP Bridge | Ethernet Trench |
| Max Range | 30-50m | 10km+ | 100m |
| Speed Loss | Low | Near Zero | Zero |
| Installation | Easy DIY | Intermediate | Heavy Labor |
| Weather Impact | Minimal | None | None |
Why Choose Smart Sat Connect for Your Property?
Setting up network coverage on rural Irish properties requires more than buying a box off a store shelf. Our field engineers bring years of practical experience solving tough connectivity problems across farms, country homes, and commercial premises.
We avoid cheap plastic extenders that freeze and need daily restarts. Instead, we install enterprise-grade hardware from brands like Ubiquiti and TP-Link Omada, built to withstand harsh winters and heavy rain.
We test every job on site, taking real-time signal measurements to pick the exact path, height, and gear for your setup. Whether you need a simple garden office link or a multi-building farmyard network, we ensure your outbuilding gets the same internet speeds as your sitting room.
Frequently Asked Questions
Q. Can Starlink internet be extended to an outbuilding?
A. Yes. Plug an Ethernet adapter into your Starlink router and connect it to a wireless bridge or buried Cat6 cable. This beams high-speed satellite internet to any barn or shed without losing speed.
Q. Do I need a second router for my garden office?
A. No. You do not need a second router or extra monthly subscription. A simple Wi-Fi access point or mesh node inside your outbuilding broadcasts your main house network seamlessly.
Q. Will heavy Irish rain disrupt a point-to-point bridge?
A. No. Enterprise wireless bridges operate on frequencies tuned to cut through heavy rain, fog, and mist. As long as trees do not block the line of sight, rainfall will not drop your speed.
Q. Can I use a standard Wi-Fi extender for a shed?
A. Standard extenders don’t do very well outside. They are not powerful enough to drive signals through heavy blockwork and foil insulation, resulting in slow and unreliable connections.
Q. What is the maximum range of an outdoor mesh Wi-Fi system?
A. An outdoor mesh node can have a range of up to 50 meters in a clear line-of-sight. For greater distances, a point-to-point wireless bridge or buried cable is required.
Conclusion: Which Setup is Right for You?
Getting Wi-Fi to your shed comes down to distance, budget, and wall materials. For short runs under 30 meters, an outdoor Mesh system offers a quick, clean solution. For distant farm sheds across a yard, a Point-to-Point bridge gives you rock-solid speed across kilometers. For a permanent link, trenching a Cat6 cable is unbeatable.
Ready to stop dealing with dropped calls and buffering in your garden office? Let our team design a custom setup that works year-round. Contact Smart Sat Connect to book an outdoor network survey today.

